Here are 4 low-to-no-cost setup tricks that will improve the concentricity of your loaded ammo. READ MORE
Glen Zediker
Cartridge cases and reloading dies all have centers. Trick is getting the centers to agree. When they do then that’s an asset to “concentricity,” and that’s attaining a major goal in the process of making better ammunition. A part that’s under pressure and moveable, such as a cartridge case being sized or a bullet being seated, moves toward a path of least resistance. If all associated tooling is “straight,” and the case itself is uniform, then the result is “straight.”
Accepting existence of tolerances and misalignments, taking steps to help two conflicting centers come close together comes from providing some free-play in the apparatus. I call it “floating,” and it serves to help, and here are a few ways.
To be clear: free-floating can help in two ways. One is to build-in float within the tool, and another is to create float and then use that to better center a tool. I’ll explain…
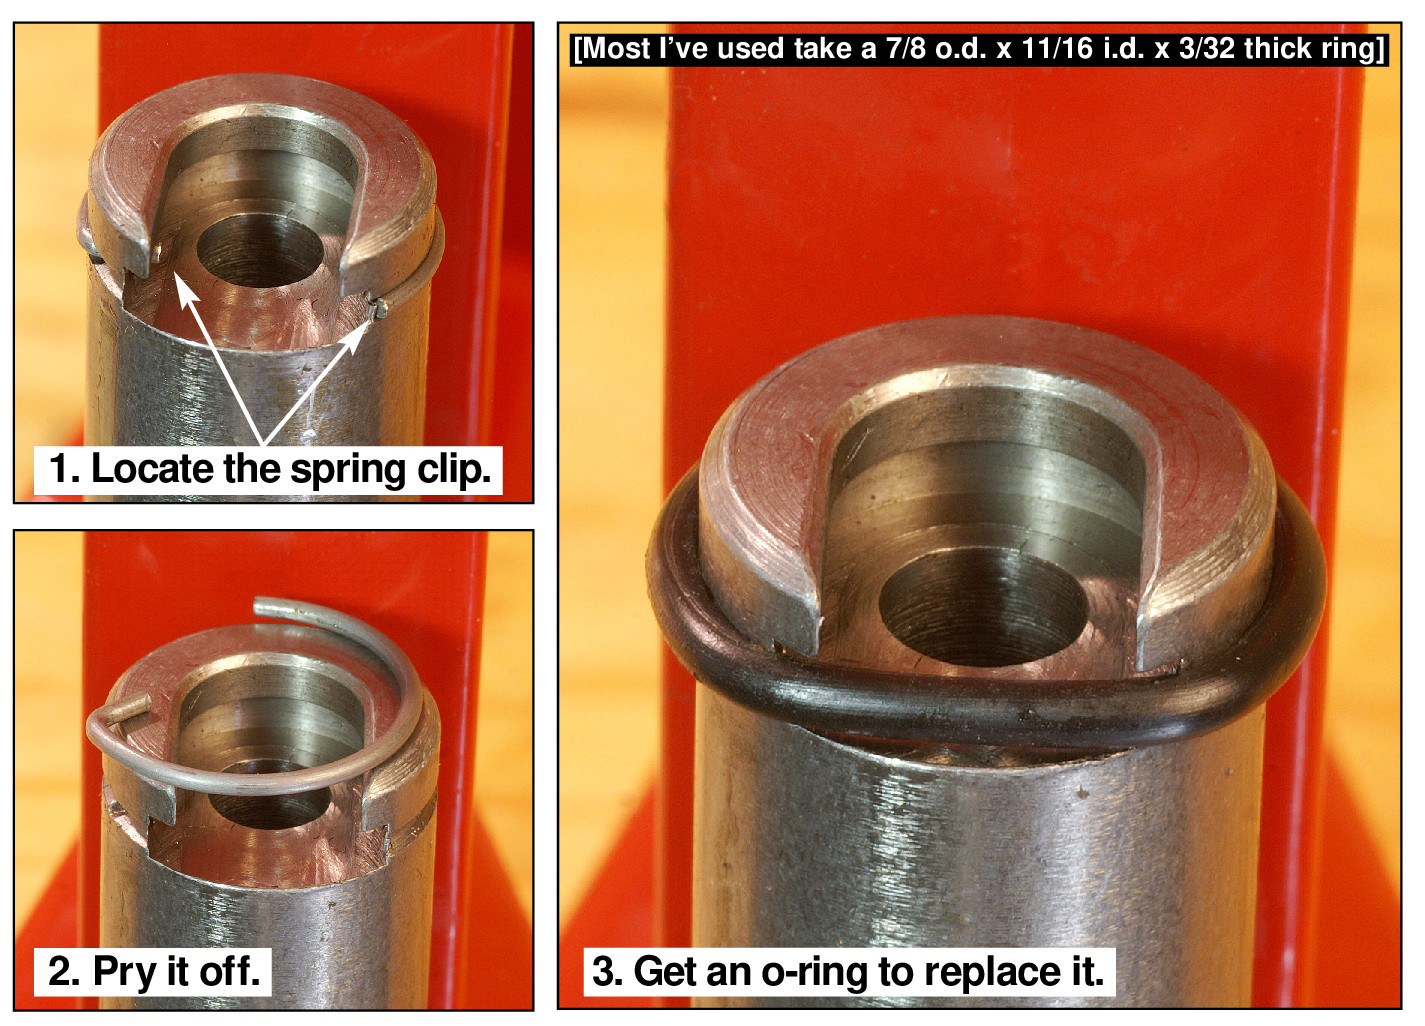
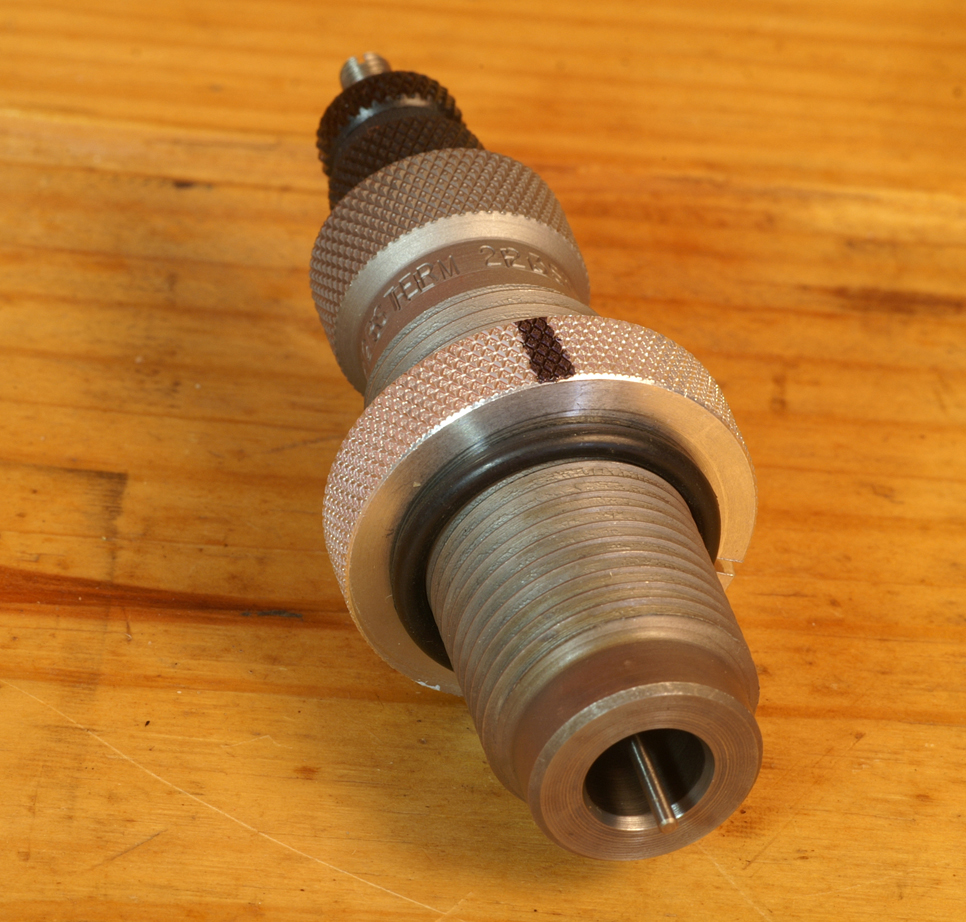
1. Shellholder
Reloading presses with conventional shellholder arrangements use a spring clip to retain the shellholder in its slot. Remove it! It sits the shellholder off on an angle.
Get to a (real) hardware store and get an o-ring to secure the clip. The o-ring goes around the slot previously occupied by the clip. To install the shellholder just roll the ring down, slide in the holder, and the o-ring will pop back up to block shellholder exit. Normally, the size needed is 7/8-inch outside diameter, 11/16 inside diameter, 3/32 thickness.
With the clip gone, the shellholder sits flat, as it should, and since the shellholder is free to move also allows some “wiggle room” so the cartridge case can center itself as it enters the die. This honestly makes a positive difference, especially in bullet seating, it seems.
NOTE: for these next “tricks,” choose a case that represents your “best,” one that’s got the most consistent neck wall thickness.
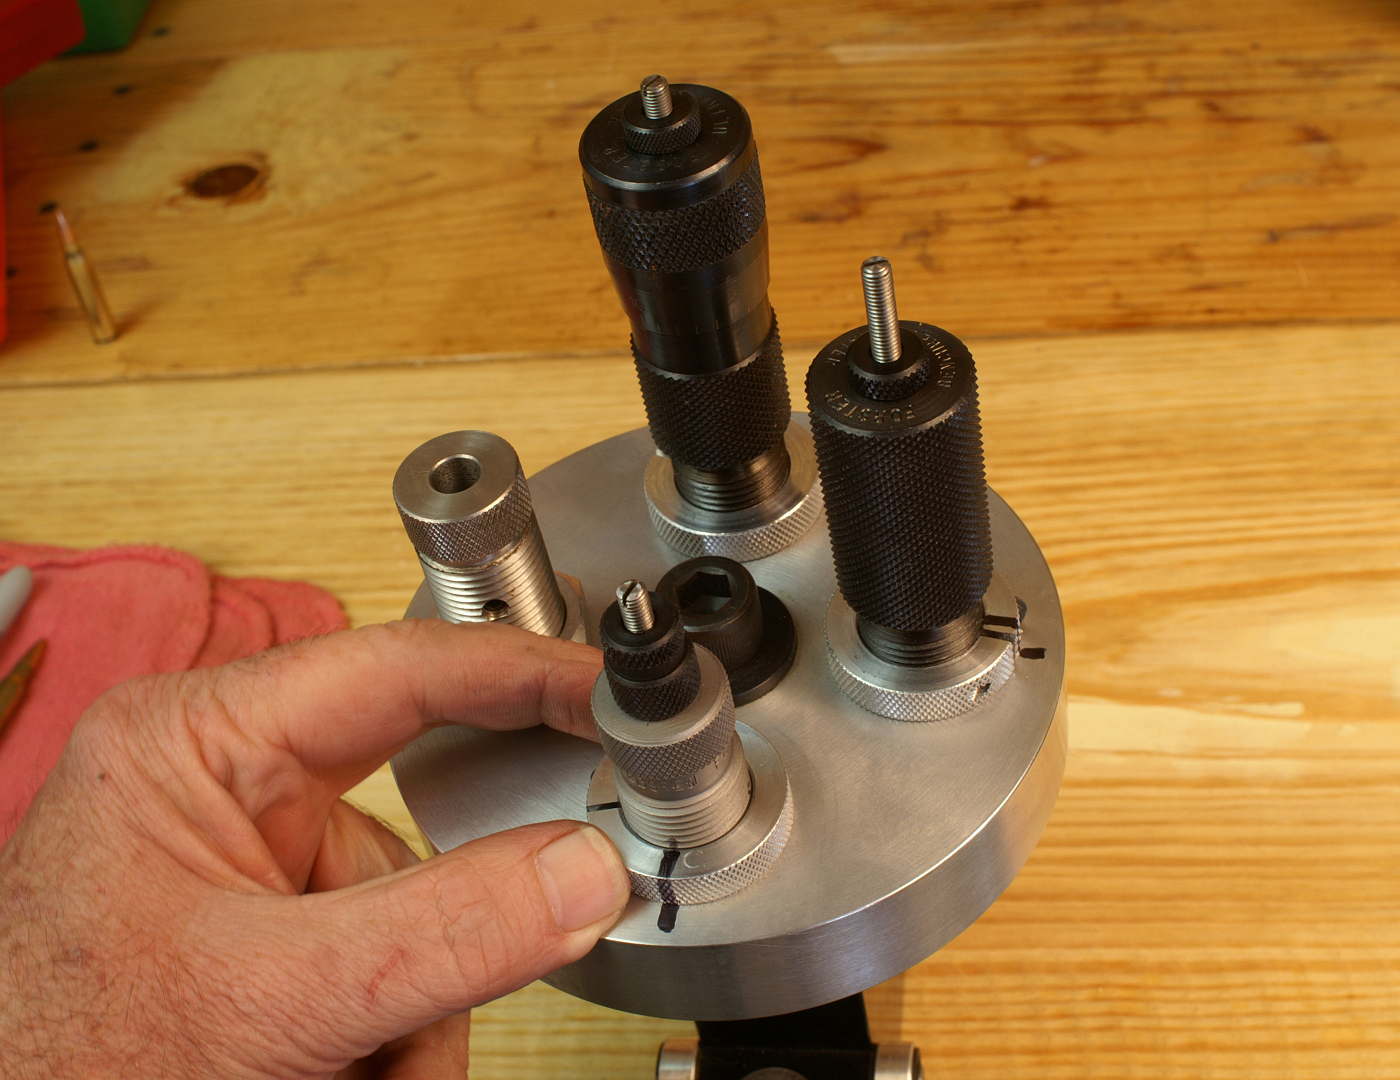
2. Sizing die lock ring
Speaking of “wiggle room,” there’s just a little too much of that in a 7/8-14 thread. It’s pretty coarse. Taking up the play created by thread-to-thread gaps results in “straighter” die installation.
Always (always) secure a die body locking ring when there is a case inside the die, and with the ram in its fully upward position (press handle all the way down). This bit of pressure helps bring the die into better alignment. It also makes the die difficult to remove after snugging down the lock ring. Just get stout on it, and, after initial removal, subsequent re-fittings are easy. I use a “strap wrench” (plumbing supply and auto parts stores will have one). “Channel-Lock” pliers also work, but result in cosmetic, but not real, damage. Lock rings with wrench-flats are the bomb.
Before initial removal of the die after the snug-up step, draw an indexing mark from the die body to the die lock ring to the press top. That’s a simple way to return to “zero,” and also to know if anything got out of kilter. Use a paint marker.
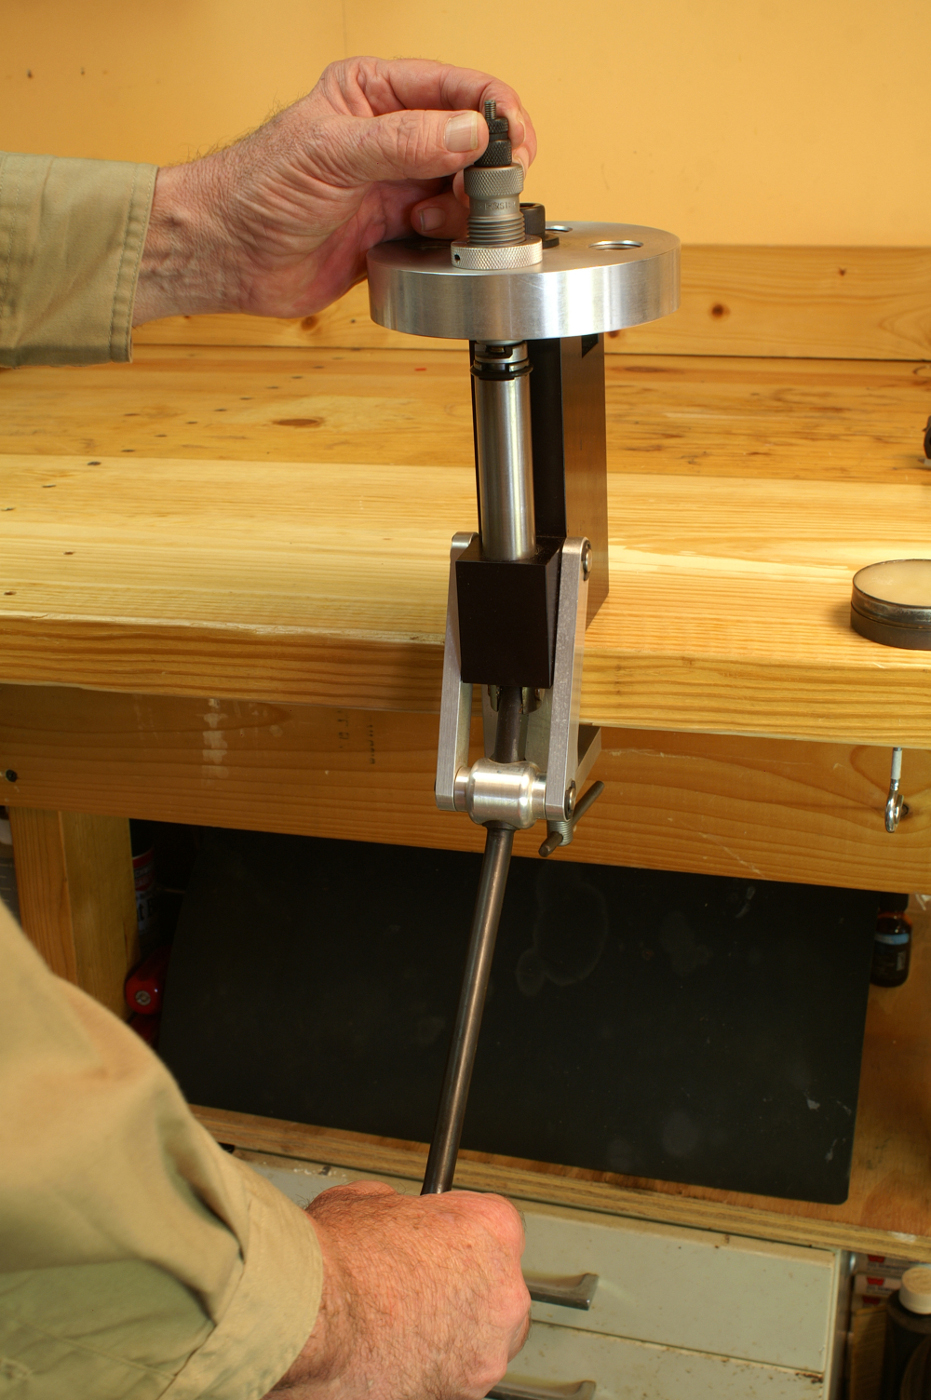
3. Sizing button (expander) / decapping assembly
To get the sizing button in a sizing die holding on center, loosen the decapping stem lock nut and run a case fully up. Then slowly retract it until you feel the button enter and lodge into the case neck. Now. Put just a little pressure back in the “up” direction (down on the press handle) and then tighten the decapping stem lock ring.
This really makes a difference, by my notes.
4. Bullet seater
Follow the same die-body-lock trick, after a bullet has been seated, and also just in the same as described for centering the sizing button (just keep the pressure “up” rather than retracting the handle) while you lock the seating stem. Flushing the die body makes a difference. Centering the seating stem may or may not, depending on the style of seating die you have. The “sleeve”-type seaters (like the Redding Competition) are already in alignment so the seating stem itself can’t be influenced. As said, the body can get a help.
One more: Lock-ring o-rings
Here’s another trick I can suggest, but don’t really use… That’s because it, indeed “works,” but I prefer these other means. The trick: install an o-ring under the die body locking ring (for sizers and seaters). This allows some movement, positioning flexibility, in helping a case center as it’s entering the die.
If you do this one, most definitely index-mark the die ring to the die body and then the ring to the press top, as suggested. Never touch the die body itself to thread in or out the die. Hold only the lock ring! (And that’s true regardless.) O-ring size is 7/8-inch inside diameter and a thickness of 1/8-inch.
NOTE: My topics over the past few editions have tended be a tad amount “nostalgic,” and there’s some reason. I just finished a new book, and this one took me way on back to the start of when I discovered reloading, which coincided with discovering my first AR15. It’s called “America’s Gun: The Practical AR15.” It will be available here soon, but not just yet. But go take a look! Information is on my web site HERE. I’m really proud of it.
This article is adapted from Glen’s books, Handloading For Competition and Top-Grade Ammo, available at Midsouth HERE. For more information about other books by Glen, visit ZedikerPublishing.com